Environment Design - or How I started worrying and learned to fear the HDRP
Something I learned pretty quickly when developing games is that the advice “don’t prematurely optimize” actually stands on a knife edge, often encouraging me to build up massive technical debt and unoptimized workflows that ultimately get shipped with the game I’m making, when really it usually means “Hey, you’re still in development, you don’t need to spend 10 hours to reduce your memory usage by another 1MB just yet.” With that in mind, when I started initial design on the level geometry and environment for Project Beta, one of my biggest concerns was optimizing for the High Definition Rendering Pipeline that I’m using in Unity. And boy did that turn out to be super important.
First let me say that I really enjoy working with Unity and I think that the new rendering pipelines, shadergraph and visual effects editor are positive developments overall. However, at least in the 2019 LTS version of Unity being used for Project Beta, understanding and working with these new tools properly is a rollercoaster combination of incredibly frustrating and delightfully rewarding. Unfortunately, optimizing level geometry, shaders and materials falls under the “incredibly frustrating” label. While the current somewhat chaotic nature of Unity means that it’s possible many of things I’m going to go over in this dev log will be either obsolete, not present, or still a problem but no longer solvable in current and future versions of the engine, I hope my struggle will help others avoid some of the same pitfalls.
Before I get too lost in the weeds talking about CPU cycles or whatever nonsense, I want to run over some of the aesthetic and design decisions that led to the (very preliminary) geometry style of Project Beta. Usually, when I’m making a game my level geometry looks like this [IMG of CUBE] Clearly a very minimalist aesthetic, with brutalist influence dictating the sharp corners and sides. - or maybe it’s just the default cube, whatever. The point is that while I know most of the art will be completely redone, I wanted a starting point that spoke more to the environment I was envisioning than a parade of literal grey boxes. I knew from past experience with my climbing system that more urban environments were more enjoyable to traverse than organic ones. This was sort of counter-intuitive to me but after getting a lot of feedback from the climbing demo, it seems like players really value predictability over dynamic level geometry. What I mean is that most people seem to prefer to easily visually scan a scene, see a climbing feature they recognize and jump to it rather than be presented with more organic structures that need to all be uniquely traversed. With that in mind, I clearly wanted some amount of regularity to my level geometry. Regularity usually makes me think of modularity, which comes with a few benefits for ease of level design and luckily works pretty well for urban environments. Before I ramble too much, here is the initial tileset I came up with for the first “tier” of buildings in Project Beta (the “first tier” being the lowest levels of the city, with the oldest and most grungy aesthetic.)

And to complement these tiles, I made a few props including: Lamp posts, neon signs, sheet metal panels, a barrel, manhole cover, wrap-around billboard (including shameless self promo) and sliding sheet metal door.

Finally, I created a small set of road tiles that can be laid out in tiers as the city gets higher

And here are some stills from the current build that combines most of these elements (plus a few detail extras)

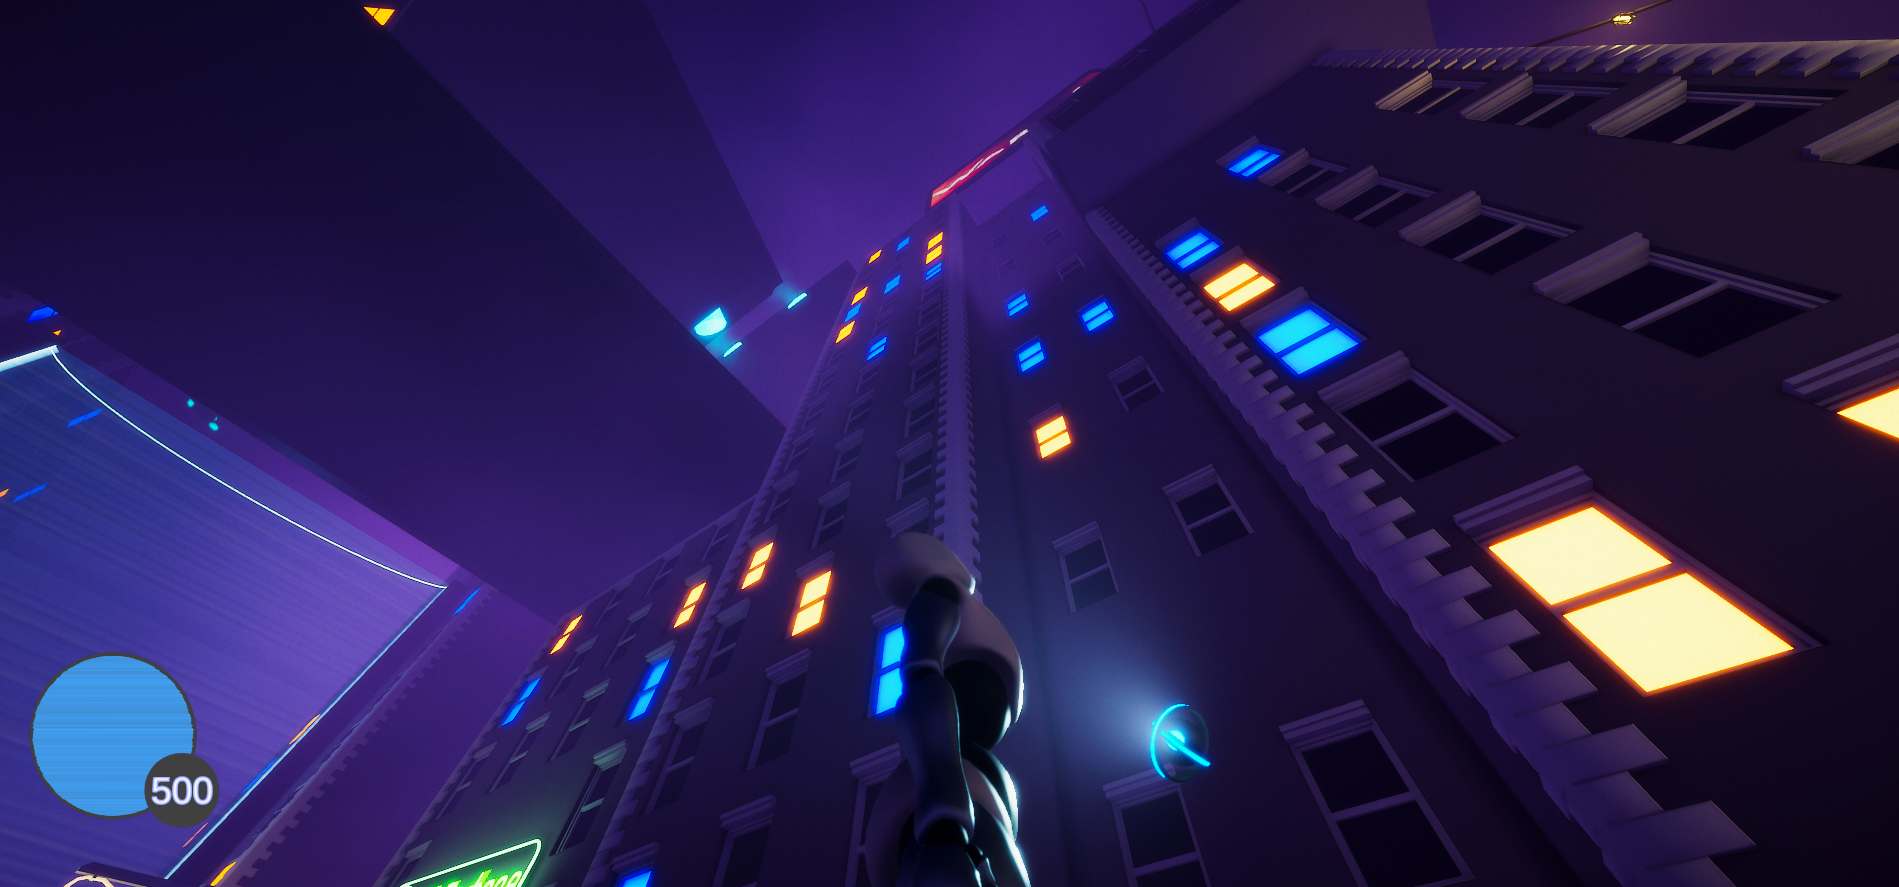
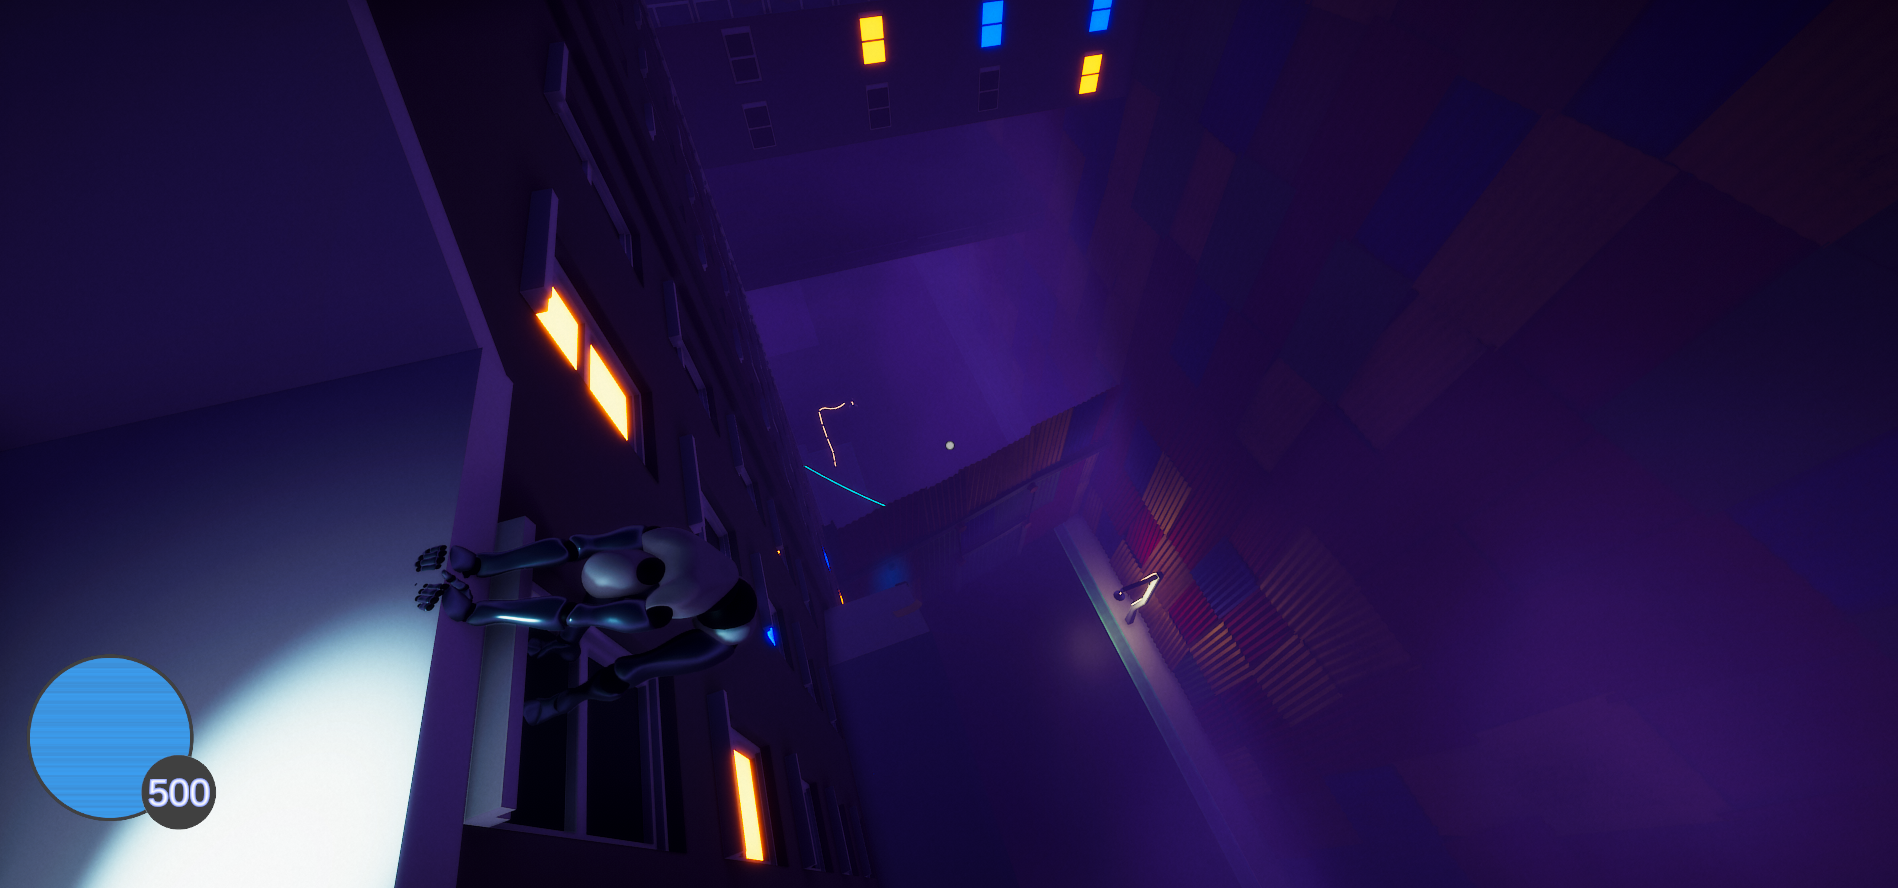
I’ve always been a fan of more simplistic art styles, so the minimal aesthetic isn’t necessarily too far from what I’ll settle on, however I would definitely like more detail in the tiles to make the world come alive a bit better. I plan on liberally applying dirt-ish decals to help with this, but I haven’t yet gotten around to making those. In general I’m going for a blend of present day city-grunge and a more futuristic “metal and glowy” vibe. My current design is to have the city you explore built higher and higher over time, changing as technology improves. This technology sort of “cascades” down, especially in response to the rise of a rebel faction which sparks a more militaristic approach from both sides, barricading streets with a mixture of new and scavenged materials and leading to the deployment of sentry cameras, drones and turrets. Hopefully this somewhat regular and a bit “larger than life” style will make traversal and climbing feel great, which is a primary goal of mine.
One of the more difficult decisions for this initial level art and design period was deciding If I wanted a more open-world style layout to the city, or a more distinct “levels” layout, with different sections of the city being separated from each other. Ultimately I decided on the latter for a few reasons, and I think it’s worth talking about since “open world” is a catchy buzzword that people like to hear, which can be really great when done well. On the other hand “loading zones” are often treated like some sort of plague, so I wanted to go over the reasons why I decided to go down that road anyway.
The first and most obvious reason is complexity. Open world level design is very technically challenging, requiring dynamic chunk loading, very aggressive LOD systems and rectifying multi-scene light bakes and AI patrol behaviors, none of which are particularly fun. Technical difficulty is usually not enough of a reason to not do something however and in this case I think that for a few reasons individual levels will serve the game mechanics and theme better than a more open experience. First of all, separate levels allow for more unique and identifiable areas within the city. While you can create an industrial district on a more open map, you can really make it stand out in a separate level since the architecture styles don’t necessarily need to blend with other areas very seamlessly. Second, I think level design should reinforce the core game mechanics which in this case are objective based climbing and platforming challenges. Having separate zones for this contains action to one area at a time with a parsable number of objectives at any given time, rather than just a large list that you can filter by rough region. In my experience a practical separation of objectives and levels feels less daunting to both return to and work through, since there isn’t a sense of the world just being too large to bother with, but I would be very interested in hearing other opinions on this so if you have one feel free to comment.
The HDRP Shaped Elephant in the Room
** Here there be technical discussion, if that is not interesting to you feel free to bail!
The first thing I noticed when working with the High Definition Rendering Pipeline (HDRP) in Unity was that the framerate was surprisingly bad. A fairly simple scene with about 900k triangles and few materials was rendering under 70fps on my dev machine. While my specs are not incredible (old-ish Intel i-9, GTX1070) I would still expect better given that I can run several modern AAA games at a higher framerate than that. While initially investigating, I found that a simple scene in the HDRP was almost immediately CPU bound. Let me briefly explain what I mean by this. The work my computer needs to do to render a single frame of a game is divided into two parts, work done on the processor (CPU) and work done on the graphics card (GPU). This work is generally done at the same time, meaning if the GPU and CPU both take 10ms to do the work required to render a frame, my frame rate would be 100 frames per second. However, if my GPU time is only 4ms and my CPU time is still 10ms, the framerate is still 100 fps. This is what being CPU bound means, any improvements made to the GPU compute time don’t actually impact the frame rate, since the CPU is still taking a full 10ms. Interestingly, the HDRP comes with a lot of CPU overhead which also unfortunately seems to scale with scene complexity, so it’s not just a fixed cost. The scaling seems to start leveling out eventually, which is good, but it does mean that we need to find a way to push more and more work to the GPU, which is sort of annoying because it’s usually more complicated.
After some more investigating, it appeared as though a major culprit to the lack of performance and CPU slamming was a strange lack of static batching. Static batching is just the act of combining unchanging meshes using the same material (shading information) at runtime, so that the GPU can treat them as one object rather than a bunch of different ones. This reduces the number of draw calls the GPU needs to execute dramatically which leads to better framerates. For some reason, static meshes with the same material being rendered in the HDRP just weren’t being batched for me, meaning when using a modular system with ~20 unique meshes per building, rendering a few hundred buildings was resulting in thousands of draw calls. I honestly could not figure out why this was the case, and the frame debugging tools were somewhat opaque at best since they sometimes seemed to indicate that everything was being batched when it clearly wasn’t, or that absolutely nothing was being batched when clearly a few things were. To solve this problem, after a lot of research, I first tried manually combining meshes with a script. That is to say, the workflow I tried initially was:
Make a modular building piece, complete with LODs
Arrange modular pieces into a building / block.
Run a script which manually combines the meshes in the building / block into one mesh, including the LODs
This isn’t the greatest in terms of flexibility, since changing a baked building mesh means reconstructing the modular building and re-baking the mesh. However, the fine grained LOD control and manual batching increased the framerate (on the same number of triangles) from about 70fps to 100fps in the Editor, which is huge. I thought this was going to be the workflow going forward, however, after some experiments for the task of instancing I found an even more performant solution.
I had been running into a lot of issues with the performance of instanced meshes in the HDRP. In theory, using the instancing feature in Unity on a material for a mesh which is repeated over and over again should result in decent performance, since the mesh data can be stored in the GPU and repeated over and over again by just transforming the data rather than rebinding vertex and index buffers and what have you. For whatever reason, I didn’t notice any performance improvements when using this feature. Possibly if I were rendering hundreds of thousands of instances it would be better but at the 5 to 10k mesh instances I was trying to render for the environments in Project Beta, the built in instancing doesn’t seem to do much.
Fortunately, the graphics API does have a great DrawMeshInstancedIndirect function, which issues draw calls for instances directly using Compute Buffers. This works well. Like surprisingly well. For example, if I need to draw even as few as 200 instances of a mesh, the overhead of using this function and the construction of the Compute Buffers is low enough that it seems to be worth it, and the results are really spectacular from a performance standpoint. You can check out my blog post on Procedural Terrain Generation for a better explanation on how I created the custom instancer I’m using, but happily with only a small amount of jank hacking we can create custom shaders with the Shadergraph that can be manually instanced very efficiently.
For example, these large sheet metal walls will divide regions in Project Beta, and you can see that each plate is actually a separate mesh with a decent amount of geometry, rendered at 3 levels of detail with shadow casting, instanced many thousands of times. There is no noticeable change in performance when rendering these walls as compared to not. Let me repeat that, rendering about 7000 instances of a 200+ triangle mesh with 3 levels of detail, cascading shadows and custom shaders has no noticeable performance impact. That isn’t to say there isn’t a cost, just that with all the overhead of the HDRP, pushing all this work to the GPU doesn’t noticeably impact frame timings since we are still CPU bound. However the upfront labor cost of getting an instanced renderer working is rather large, which is unfortunate because the tools to do so do exist.

Ideally the “use instancing” Material option in Unity would do something similar to this, and for all I know it’s supposed to but for whatever reason it seems that we are still stuck in a world where we appear need to roll it ourselves, although if there is something obvious I’m missing I would definitely love to hear about it. Unfortunately this seems like a bit of a pattern with Unity, you can pretty much accomplish anything you want but there are usually several competing ways to do so which are in various stages of development at any time. I think the LTS releases have helped with this in that they at least lock feature updates, but I’m starting to get worn down by all the different rendering pipelines and whether or not I should or shouldn’t use any of them and the many emerging and competing workflows are starting to get confusing. Alright, mini rant over, sorry about that.
With the reality of the performance of custom instancing in mind, I wound up instancing way more meshes than I expected. Actually all the modular building blocks above are currently instanced in Project Beta. In order for this to work well with collision meshes and interaction, I created a helper script to comb through meshes that should be instanced on scene load and deactivate the mesh renderers, passing the relevant data to a singleton mesh instancer which can efficiently render them. For example, things that are instanced in this image:

Sheet metal panels
Paper on the ground
Cans on the ground
Literally every wall and window
All the trim
Hanging lanterns
This might seem like overkill, but the efficiency of DrawMeshInstancedIndirect makes this scene render about 30% faster than the standard static batched version on my machine. Here is a look at the still above with the instancer turned off.

It seems like compute shaders will probably be a big part of development going forward, mostly because (surprisingly) the HDRP seems to almost immediately be CPU bound, if the frame timings can be trusted. Let me briefly explain what I mean by this. The work my computer needs to do to render a single frame of a game is divided into two parts, work done on the processor (CPU) and work done on the graphics card (GPU). This work is generally done at the same time, meaning if the GPU and CPU both take 10ms to do the work required to render a frame, my frame rate would be 100 frames per second. However, if my GPU time is only 4ms and my CPU time is still 10ms, the framerate is still 100 fps. This is what being CPU bound means, any improvements made to the GPU compute time don’t actually impact the frame rate, since the CPU is still taking a full 10ms. Interestingly, the HDRP comes with a lot of CPU overhead which also unfortunately seems to scale with scene complexity, so it’s not just a fixed cost. The scaling seems to start leveling out eventually, which is good, but it does mean that we need to find a way to push more and more work to the GPU, which is sort of annoying because it’s usually more complicated. To me this is yet another reason to try to render as much scene geometry as I can with DrawMeshInstancedIndirect, although I really am waiting for the other shoe to drop on this since it seems too good to be true.
After so much experimentation and optimization, I’m definitely looking forward to some solid feature implementation for the next dev log. The mechanics and features that I hope to have completed for the third dev log are:
Path planning in 3D (Voxel based)
Basic AI infrastructure
AI Cameras and patrol / sweep behavior
Basic interaction system (“E” to open etc.)
Stamina system
I’m not sure all of these will be completed, but they will all hopefully be started enough for to talk about them. Thanks for reading and as usual feel free to reach out on Twitter @UpRoomGames!